Showing posts with label Just a Little Info!. Show all posts

The Perfect Smoothie Formula

The Perfect Smoothie Formula

The way I see it, you only need to eat healthy twice during the day.  While you’ll certainly eat more than twice a day, just two healthy meals make it pretty hard to screw up the rest of them.
Once is in the afternoon, when a big salad loaded with greens, other raw vegetables, and nuts will fill you up and give you more veggies than most people eat all day.  And as a bonus, it’ll give you the chance to get even more good stuff, when you dress it with quality oil, lemon juice, and a little sea salt.
The other time is in the morning when a smoothie made from fruits (and even vegetables) will not only set the tone for the entire day but act as a vehicle for other superfoods or supplements you want to work into your diet.

That’s it. Just two healthy meals.

Even if you ate whatever you wanted the rest of the day, I’d be willing to bet you wouldn’t get fat, as long as you made sure to drink a smoothie and eat a big salad every single day.
Sure, if you were to eat at McDonald’s for lunch and Outback for dinner the rest of the time, you could probably succeed at packing on a few pounds.  But here’s the thing.
The smoothie and salad act as “anchors” that keep you on track, to remind you just how great it feels to put real, fresh fruits and vegetables in your body.  After you start the day with a smoothie, McDonald’s for lunch doesn’t seem so good anymore.  And when it’s time to start thinking about dinner, the salad does the same.
In this way, those two healthy meals become three or four—which doesn’t leave much time for junk.

Why people suck at making smoothies

Most people are alright when it comes to the salad.  But there’s something about the alchemy of throwing a few fruits, ice, liquid, and whatever else into a blender and ending up with a perfectly smooth and delicious drink that causes lots of people to struggle.
Since nearly everyone has a blender (I use a Blendtec myself, I suspect that the reason most people don’t make smoothies consistently is that it’s overwhelming.  There are too many possible ingredients, and too many variables to tweak to get the proportions just right. And if someone should stumble upon a good recipe, they end up making it so often that they get sick of it and never drink it again.

We need a formula

Over the past few years, I’ve had a smoothie almost every single day.  I’ve constantly tweaked it, experimented with new ingredients, and kept track of what worked and what didn’t.
What follows is my version of the smoothie genome project.  It’s a formula you can follow to create nearly endless variations.  And the best part is that the uncertainty has been taken out of it for you.  You’ll need to experiment with different flavor combinations, of course, but the guesswork about proportions has largely been removed.
The recipe below specifies general amounts and types of ingredients (like “2 tablespoons binder”) and then below, you are given a menu of several recommended ingredients of each type from which to choose to make your smoothie.

The Perfect Smoothie Formula

(makes 2 smoothies)
  • 1 soft fruit
  • 2 small handfuls frozen or fresh fruit
  • 2-4 tablespoons protein powder
  • 2 tablespoons binder
  • 1.5 tablespoons oil
  • 1.5 cups liquid
  • 1 tablespoon sweetener (optional, less or more as needed)
  • optional superfoods, greens, and other ingredients
  • 6 ice cubes (omit if soft fruit is frozen)
Select one or more ingredients of each type below and add to blender in specified proportions. Blend until smooth.
Recommended Soft Fruits
  • Banana
  • Avocado
(If you have a high-speed blender that can puree, say, a whole apple or carrot without leaving any chunks behind, then the puree of almost any fruit or vegetable can act as your soft fruit.)
Recommended Frozen or Fresh Fruits
  • Strawberries (you can leave the greens on if you have a powerful blender)
  • Blueberries
  • Blackberries
  • Raspberries
  • Peaches
  • Mango
  • Pineapple
Recommended Protein Powders
  • Hemp
  • Sprouted brown rice (tastes chalkier than hemp, but packs more protein per dollar)
  • Pea
  • Vega Sport (combines all three for complete amino acid profile)
  • Lifetime Life’s Basic’s Plant Protein (an affordable hemp, rice, pea, and chia protein blend)
(Soy and whey are higher-protein, generally cheaper options, but for a variety of reasons I don’t recommend either for long-term use.)
Recommended Binders
  • Ground flaxseed
  • Almond butter or any nut butter
  • Soaked raw almonds (soak for several hours and rinse before using)
  • Rolled oats, whole or ground
  • Udo’s Wholesome Fast Food
Recommended Oils
  • Flaxseed oil
  • Udo’s Blend or other EFA blend
  • Hemp oil
  • Coconut oil
  • Almond, macadamia, or other nut oil
Recommended Liquids (unsweetened)
  • Water (my favorite)
  • Almond milk or other nut milk
  • Hemp milk
  • Brewed tea
Recommended Sweeteners
  • Honey (not technically vegan)
  • Agave nectar (high in fructose, so choose this only before workouts)
  • Stevia (sugar-free natural sweetener, the amount needed will vary by brand)
Optional Superfoods, Greens, and Other Ingredients
  • Cacao nibs (1-2 tablespoons)
  • Carob chips (1-2 tablespoons)
  • Ground organic cinnamon (1-2 teaspoons)
  • Chia seeds, whole or ground (1-2 tablespoons)
  • Greens powder (1-2 teaspoons)
  • Whole spinach leaves (1-2 handfuls)
  • Maca powder (1-2 teaspoons)
  • Jalapeno pepper, seeds, and stem removed (one small pepper)
  • Ground cayenne pepper (small pinch)
  • Sea salt (pinch)
  • Lemon or lime juice (1 tablespoon)
There’s plenty here to get you started.  But you certainly don’t have to stay within these guidelines if you determine that you want more or less of a certain ingredient or more than one ingredient from each category. (For example, almond butter and ground flaxseed are both in the “binder” category, but I sometimes include both in my smoothie.)
Also, note that which ingredients you use from one category often dictate how much you need from another.  For example, if you’re using avocado instead of banana as your soft fruit, you’ll need more sweetener than you would with the banana, and you’ll probably want to go light on other fatty ingredients since avocado provides plenty of good fats.
So be creative, and don’t worry if at first, you like more of the sweet ingredients and not so much of the healthier ones. Over time as you eat less and less processed and sugary foods, your tastes will change and you’ll actually crave the healthy stuff.

HOW TO MAKE A CHIA EGG


An easy 1-ingredient chia egg! The perfect egg substitute in vegan recipes like pancakes, waffles, quick breads, cakes, and more!

Ingredients
  • 1 Tbsp (13 g) chia seeds
  • 2 1/2 Tbsp (37 ml) water


Add chia seeds to a small dish and top with water. Stir and let rest for 5 minute to thicken. It should be gel-like and thick.
It's not an exact 1:1 substitution in every recipe because it doesn't bind and stiffen during baking quite like an egg does. But, similar to a flax egg, it works well in pancakes, quick breads, muffins, cookies, and many other baked recipes.

Flaxseed Meal Egg Replacer


Image result for Flaxseed Meal Egg Replacer

Use this formula to substitute for one egg. Double for two eggs, triple for three eggs, and so on... Zero cholesterol! Gluten Free, Lactose-Free, Low Cal, Low Carb, Low Fat, No Sugar, Organic, Soy Free, Vegan.


Ingredients
  • 1 Tbsp Flaxseed Meal  
  • 3 Tbsp Water
Instructions
  1. Combine flaxseed meal and water and allow to sit for about 5 minutes. Add this ingredient to your recipe as you would the eggs.

How To Make Aquafaba

Image result
If you’ve been paying attention to the food world over the past several months, you may have encountered the miraculous discovery of aquafaba. In case you don’t know, aquafaba is the liquid that you find in cans of chickpeas (and other legumes). Aquafaba translates to “bean water” and was discovered by a community of people (but largely Goose Wohlt and Joël Roessel). It is my new favorite ingredient for replacing eggs, and I’m kind of obsessed. Not much is known about the nutritional/chemical breakdown of aquafaba yet, but here are a few things you should know about this magical liquid.

SUBSTITUTING FOR EGGS

3 tablespoons of aquafaba replaces 1 whole (large) egg.
2 tablespoons of aquafaba replaces 1 egg white.

USES FOR AQUAFABA

Aquafaba whips up like egg whites and can be used for meringues, pavlovas, and marshmallows, and it can also be used in its liquid form in some baking applications. People are still experimenting to find all the uses for aquafaba, but so far I have personally used it as a replacement in quick breads and cookies, and I’ve made mozzarella cheese that melted beautifully on a pizza. I’m looking forward to more experimentation, but I recommend joining the Vegan Meringues Facebook group if you are interested in learning more. One great thing about aquafaba, compared to egg whites, is that you can’t really overwhip it.
Be wary, though. Because aquafaba is so new to the culinary world, not all its uses have been discovered and it’s not entirely scientific. Replacing large quantities of egg whites, like in angel food cake, hasn’t worked for anyone so far. When we tried to use it to replace eggs in a non-vegan cornbread recipe, the cornbread wouldn’t set up in the middle. So if you’re experimenting, be prepared for some failures, or use a recipe that has already been tested with aquafaba! 

DOES IT TASTE LIKE BEANS?

Aquafaba kind of has a funky smell, but don’t let that scare you. Once it’s whipped or used in baked goods, I haven’t detected any bean-like flavor. Even in the meringues, which were just aquafaba and sugar (and a little vanilla). Some people are more sensitive, so if you find the chickpea aquafaba to be too aggressive, the aquafaba from cannellini beans is more neutral.

WHERE TO GET AQUAFABA

The easiest and fastest way to get aquafaba is to buy a can of chickpeas, and drain the liquid through a sieve into a container. If you can find unsalted or low-sodium canned chickpeas, all the better. I typically use regularly salted canned chickpeas, and I don’t think it has made desserts too salty, but you could always reduce the salt in the recipe if you find it necessary.
If you want to avoid the preservatives, additives and/or BPA that is often found in canned chickpeas, you can always make your own! See the recipe below for instructions on how to do it.

STORING AQUAFABA

I’ve successfully used aquafaba from the refrigerator for up to a week. If I need to store it longer than that, I like to divide it among ice cube trays and freeze it. Putting 1 tablespoon into each slot in the ice cube tray makes measuring easy.


Prep Time
10 min
Cook Time
9 hr
Total Time
12 hr 10 min
INGREDIENTS
  1. 4 cups dried chickpeas
  2. 1 teaspoon kosher salt
  3. 12 cups water
INSTRUCTIONS
  1. Place chickpeas and salt in the insert of a slow cooker. In a large saucepan, bring water to a boil. Pour the boiling water over the chickpeas. Cook on low for 9-10 hours, until the chickpea liquid is about 1/2-inch above the chickpeas. Turn off the slow cooker and allow to cool at room temperature for at least 4 hours and up to 8 hours. As the chickpeas and liquid cool, the chickpeas will absorb a bit more of the liquid and it will just cover the top of the chickpeas. The liquid will become viscous and gel-like as it cools.
  2. Place a fine mesh strainer over a large bowl. Strain the chickpeas out, catching the aquafaba in the bowl. Transfer the aquafaba to jars or other covered container. Refrigerate for up to a week or freeze for longer storage.*
NOTES
  1. *Consider freezing the liquid in 1-2 tablespoon amounts in ice cube trays for easy thawing and measuring.

Wrapping lumpia

Wrapping lumpia is definitely both an art and a science. The science part is as follows.
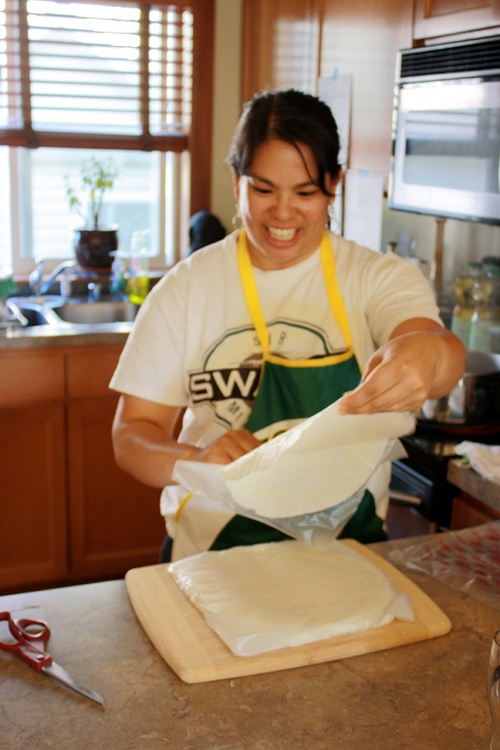
First of all, it’s usually very tricky to remove the lumpia wrappers from the frozen stack they come in. Madeline did we (us?) noobs a favor by buying wrappers individually wrapped in plastic. Environment, 0: Helen and Dawn: 1.
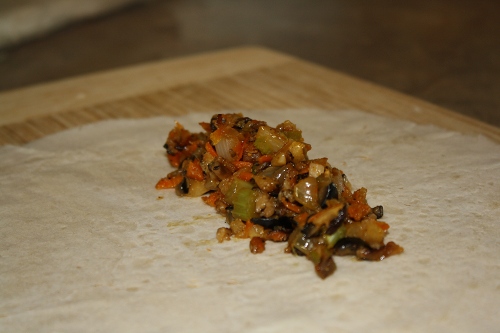
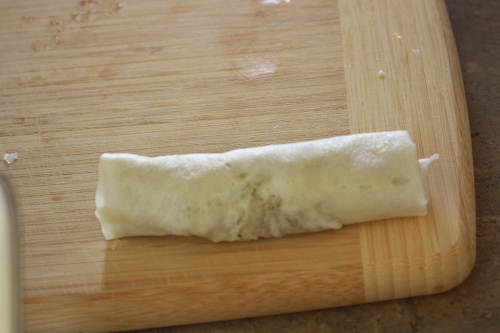
Next, place some filling in the center of a lumpia wrapper, about 3/4 of the way from the bottom edge.
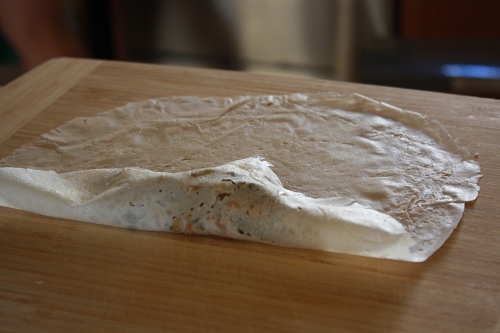
Fold the upper edge over.
Crease the edges in and start to roll.
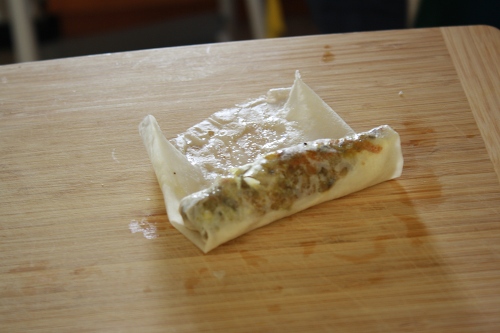
Dab some egg replacer mixed with water on the edges and press to seal.
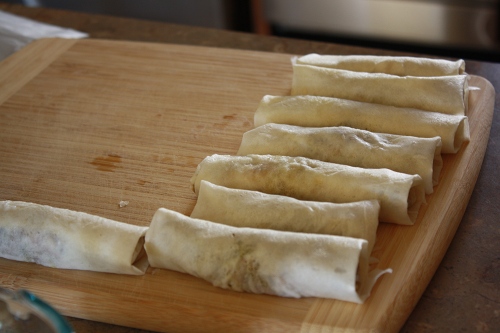
Place lumpia seal side down on a flat surface and repeat. And repeat. And repeat. And repeat…
The art part is making sure that you roll up your lumpia in perfect, plump, cylindrical little cigars, not floppy, flaccid, flat, uhhh, little cigars Then you fry them up. Try not to burn them like this person did
 

A note on making homemade Seitan

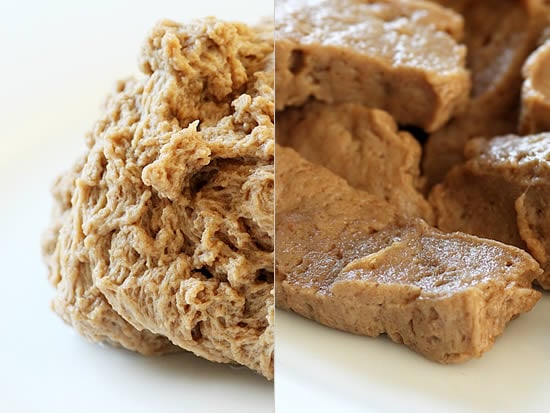
There are three points we feel are key to making great seitan:
Image result for homemade seitan
  1. Don’t be afraid of seitan! Making homemade seitan is not that difficult, and it is well work the effort.
  2. Get good wheat gluten — In our experience the best option is to buy wheat gluten in bulk rather than already in a box. We have always had bad results with prepackaged wheat gluten, perhaps cause it has sat unused for a while. Buying from a health food store or a co-op is the best bet; or, if that isn’t an option, buying it online.
  3. If you want chewy seitan then knead the hell out of that gluten dough ball! After you have mixed the dry and wet ingredients knead for at least 5 minutes (if your hands can handle it, 10 is preferable). Then let the dough sit. Drink the beer that you cracked open and haven’t touched cause your hands have been wrist deep in seitan. After the seitan has sat for a bit, go back and knead some more. All this needing to knead (had to make the pun) actives the gluten and causes the seitan to become chewy.

A vegan or Vegetarian meal day on a budget


Vegan Budget Trader Joe's

For anyone who may be skeptic to this whole vegan/vegetarian shopping sitch, I’m here to tell you that the rumors are false. Eating vegan is not expensive, and it is much easier than it seems. So, I put together this list – $50 worth of veg-friendly food from Trader Joe’s that will get you through the week (or longer). I am basing this off of a household of 2, but you can adjust accordingly.
I am also choosing products while assuming you have the essentials at home already (you know, oil, vinegar, butter, spices, and various other condiments). I hope that makes sense… but of course, swap out items and add in anything you may need. This is just a template, and a little proof that it’s possible to shop frugal and eat well ;)
For a grand total of $49.43, you can buy:
  • romaine lettuce (3 heads) – $1.99
  • plum tomatoes (3) – .87 cents
  • bag carrots – .79 cents
  • bag of kale – $1.99
  • avocado (1) – $1.00
  • white button mushrooms box – $1.99
  • bag of potatoes – $1.69
  • bag of yellow onions – $1.99
  • bananas (5) – .95 cents
  • bag of apples – $2.49
  • container of strawberries – $4.99
  • brown basmati rice – $3.29
  • creamy unsalted peanut butter – $2.79
  • tempeh or tofu – $1.99
  • pasta – .99 cents
  • soy milk – $1.69
  • roasted garlic hummus – $1.79
  • can of organic black beans – $1.19
  • bag of brown lentils – $1.69
  • raw cashews – $6.99
  • ezekiel sprouted bread – $3.99
  • tomato basil marinara – $2.29
Prices may vary depending on your area/store, but this is what it came out to be at our local Trader Joe’s.
Play around with this list! The most expensive item on here is the cashews for 6.99 or the container of strawberries for $4.99. Strawberry especially would normally be my choice of snack, but if it’s not yours, then take that $5 and pick up some tortilla chips, salsa, dried fruit, or granola bars. Don’t like cashews? Find another type of nut. It’s really up to you what you want to buy for your snacks, but this is just a good starting point. Just looking at this makes me happy because I can see a ton of meals for the week here. Just a few ideas…


Breakfast:
  • toast with peanut butter, glass of soy milk
  • tofu scrambles (with veggies and black beans!)
  • avocado toast
  • toast with hummus and tomato slices
Lunch:
  • peanut butter and banana sandwich, glass of soy milk
  • kale and vegetable soup
  • kale, romaine, avocado, and tomato salad
  • baked potato with cashew cream sauce and black beans
  • sandwich with avocado, lettuce, tomato, and hummus
Dinner:
  • pasta with marinara sauce
  • vegetable stir fry, side of rice
  • lentil soup
  • baked tofu
  • black bean soup
Snacks:
  • hummus and carrots
  • handful of cashews
  • apple with peanut butter
  • strawberries

How to Make a Delicious Vegan Bowl (Even If You Don't Know How to Cook)

Going vegan can seem daunting for many reasons. One of the main ones is that most people have to learn how to cook in a slightly different way (or even learn to cook in the first place). You absolutely don’t need animal products at the center of your plate to feel full and satisfied, but if you just make salads or microwave meals every day, you’re unlikely to feel satiated or healthy in the long term.

Enter your basic vegan bowl. If you learn to make a great bowl, you will never be bored, hungry, or broke. Making bowls is a cheap, satisfying, and healthy way to eat—and I should know, I eat at least one a day. That said, I’m extremely privileged: My partner is the cook, and I just eat his tasty, whole-food, plant-based meals. More and more friends who have eaten at our house ask for his recipes. But he insists he doesn’t have any, just a simple formula. I realized it would be a useful service to provide that formula.

So here you have it: simple instructions on making an amazing, filling, and healthy bowl, even if you’ve never cooked before. I’ve broken it down step by step as simply as possible so that these instructions make sense to people who tend to get overwhelmed by the idea of cooking. You can do this. I promise!

Choosing Your Ingredients


Every satisfying bowl has a few components: 1–2 grains, 2–6 different veggies, and 1–2 legumes.

Grains: 


Take your pick of brown rice, white rice, amaranth, quinoa, wheat berries, farro, or some kind of noodle.

Keep these stocked in your pantry. If you’re often in a rush or have a fear of cooking grains, you can also buy microwavable brown rice or quinoa at Trader Joe’s—but that won’t be as cheap.

Vegetables: 


Really, there are no wrong answers here. In general, the best way to get different nutrients is to have a couple of different colors represented. There should be at least one green vegetable (kale, broccoli, greens, peas, fennel, celery, zucchini, etc.). You’ll also want red, orange, purple, or yellow vegetables (bell peppers, carrots, sweet potato, purple cabbage, corn kernels, etc.). The more colors the better, but you can also keep it simple.

We always keep a bunch of frozen veggies in the fridge so that we are never without. Broccoli, asparagus, corn, peas, and spinach are staples, while we tend to buy carrots, fennel, kale, and cabbage fresh.

You’ll also always want to keep onions, garlic, and ginger in the house.

Legumes: 


Buy a bunch of cans, and keep your pantry stocked! We prefer unsalted beans, but it’s up to you.

Options include black, cannellini, garbanzo, pinto, kidney, and black-eyed peas—or whatever else you find! Legumes could also be tofu, tempeh (we love the three-grain tempeh from Trader Joe’s), or lentils.

Condiments and Toppings: 


You’ll always want some yummy toppings for your bowl on hand. Here’s what we use most: nutritional yeast, sesame seeds, hot sauce, tomatillo salsa, Sriracha, sunflower seeds, chia seeds, hemp seeds, and tahini.

Cooking Your Bowl


OK, I’m going to break it down very simply here. More experienced cooks, please don’t be offended.

Choose your grain, and put it in a pot with the appropriate amount of water (Google this if you’re not sure). Leave the top off the pot, put the pot on the stove, and set heat to high. Once water is boiling, turn down to simmer, and cover. Depending on the grain, this will take anywhere from 10 to 45 minutes total.

As grains are being brought to a boil, chop up your onions (about half an onion per person), and put a small amount of oil in a pan (or a layer of water, if preferred). Cook the onions while you’re chopping up the other vegetables. If you like garlic and ginger, dice them up (a clove or two of garlic per person; a little less for the ginger), and once onions are sautéed to translucent, throw them in. Onions can be further sautéed, if you prefer them caramelized.

If you’re using tempeh, chickpeas, or tofu as your legume, throw them in at the beginning so they can brown with the onions. Once onions are turning translucent and legumes are starting to brown, throw in your vegetables.


The easiest and tastiest way to season tempeh, tofu, or noodles is with Sriracha, 1–2 capfuls of toasted sesame oil, and a touch of soy sauce or Bragg’s. Put these on when you start cooking tempeh or tofu, and mix thoroughly so all tempeh or tofu is coated with sauce beforehand. If you want this sauce on your noodles, add cooked noodles and sauce to the pan with all your veggies during their last minute of cooking, turn flame down to a simmer, and stir that bad boy up.

In which order should vegetables go in the pan? A basic rule to follow as you’re learning is that denser vegetables go in earlier (fennel, carrots, celery, etc.), while leafy veggies go in last (kale, spinach, etc.). Cook denser vegetables for 3–4 minutes (unless they’re a tuber-like sweet potato, in which case you’ll need to roast or sauté them ahead of time), and then throw in lighter veggies, cooking for another couple of minutes.

If salt and pepper are preferred, add them toward the end of cooking.


And that’s it! Top with nutritional yeast or whatever other condiments or sauces you like.

Sample Bowl Combinations


Like I said, you can’t go wrong, but these combinations should get you started.

Simple Mexican Bowl: 


Onions, garlic, black or pinto beans, rice, carrots, green vegetable(s) of choice, top with salsa

Tempeh Asian Noodle Bowl: 


Onions, garlic, ginger, tempeh, carrots, green vegetable(s) of choice, noodle of choice, top with sesame seeds

Macro Bowl: 


Legume of choice, grain of choice, vegetable(s) of choice, top with sauce and if on hand, sauerkraut and avocado